

In a recent Tandem "Ask Me Anything" webinar on risk assessments, one of the attendees asked, "What is a GLBA risk assessment?" This is a great question and one that is foundational to the world of information security for financial institutions. Let's talk about what it is and how to do one, with a dash of history for good measure.
First, GLBA.
"GLBA" is the acronym used for the "Gramm-Leach-Bliley Act." When this term is used in financial institutions to talk about information security, it is often used to refer to GLBA Section 501(b). This 1999 legislation put the federal banking agencies into motion, asking them to develop information security standards to guide how financial institutions must secure customer and member information.
The Interagency Guidelines
In response to GLBA, the agencies published the "Interagency Guidelines Establishing Information Security Standards." Here is the regulatory reference for each agency's version.
- FDIC: 12 CFR Part 364 Appendix B
- FRB: 12 CFR Part 208 Appendix D-2
- NCUA: 12 CFR Part 748 Appendix A
- OCC: 12 CFR Part 30 Appendix B
These are the standards which define the core elements of a GLBA Risk Assessment. Specifically, section III.B. of the interagency guidelines requires each financial institution to do three things:
- Identify threats to customer data.
- Assess the risk of the threats.
- Assess the sufficiency of controls.
This process has come to be known as a "GLBA Risk Assessment." (Although, you might be more familiar with its stage name: "Information Security Risk Assessment.")
Early Versions
As financial institutions began to implement the standards, the first GLBA Risk Assessment "template" which began to circulate widely was seen in 2004. While the exact origins of the spreadsheet remain shrouded in history, legend tells us the template originated from examiners.
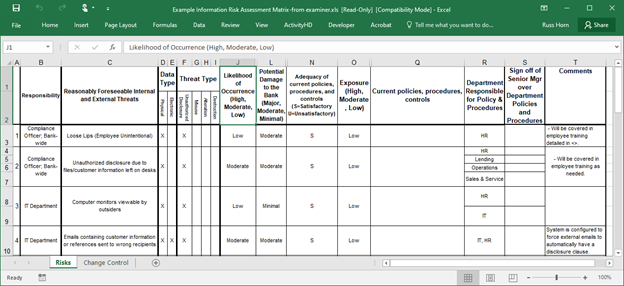
Fun Fact: This was commonly referred to as the "Loose Lips" risk assessment, due to the naming of the first threat on the spreadsheet.
What is most interesting is that while threats and technology have evolved over the years, decades after this spreadsheet appeared, the general process remains nearly the same.
How to Create a GLBA Risk Assessment
So, what exactly is the process for creating a GLBA Risk Assessment? Well, there are six primary steps. In the rest of this article, we'll review, break down, and provide examples for each of these steps.
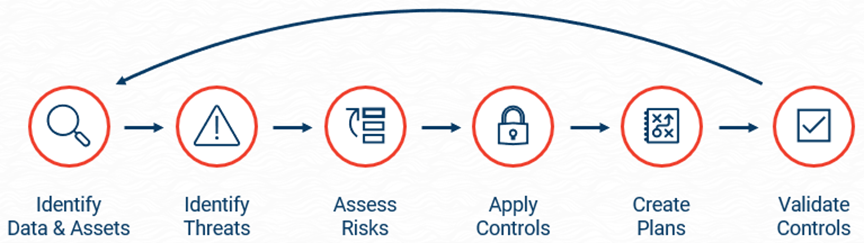
Step 1: Identify Data & Assets
The first step in a GLBA Risk Assessment is identifying what you are protecting: your data and your assets. Here's how it works.
- Create a list of the types of data you have. This could be account numbers, loan applications, contact information, account balances… Any kind of information about your organization or your customers should be included as part of this list. You don't need to be overly specific (e.g., "GLBA Risk Assessments Blog for Tandem.App"), but generic categories can give you an idea of the data you need to consider (e.g., "Public Website Content").
- Classify each data type. For example, some of your data might be "Public," like website content, while other types of data may be "Private" or even "Restricted," like account numbers. Of course, all data needs to be protected, but determining the sensitivity of your data helps you prioritize and know how much emphasis you should place on protecting each data type.
- Create a list of the assets which have a relationship with your data. This means anything which can access, store, process, transmit, or protect the data. Most often, this is going to be your technical systems (e.g., servers, laptops, applications), but it could also be physical systems (e.g., filing cabinets, facilities) or even the people you work with. We call these "assets."
Once you have your lists of data and assets, throw everything into a bowl and mix, mix, mix. The result will be a list of your assets which need to be protected. Pay special attention to the assets which are correlated with a lot of "Restricted" or "Private" data. If compromised, these will be your major pain points, so make decisions with them in the front of your mind.
Takeaway: A GLBA Risk Assessment must start with knowing what data you are protecting.
Step 2: Identify Threats
Once you know what data you need to protect, the next step is to identify what could go wrong. While the possibilities are indeed endless, the Interagency Guidelines give us a little direction. Specifically, we're looking for threats which:
- Are "reasonably foreseeable." This limits the scope of threats from anything which could happen to a smaller subset. So, before you start assessing the risk of a "zombie apocalypse," take those few minutes and work on your cardio instead.
- "Could result in unauthorized disclosure, misuse, alteration, or destruction." These are commonly referred to as the "UMAD" threat types. (Pronounced "you mad." As in, you might not be now, but you might be by the end of all this.) Today, these concepts are more often described through the "CIA Triad" of Confidentiality, Integrity, and Availability, but the principle remains the same.
The point is to identify the negative things which could happen to your assets and data. Even with these qualifiers, you don't have to look very far. Here are a few to kickstart your train of thought: malware, phishing, compromised credentials, sabotage, fire… All aboard!
Takeaway: Make a list of the threats which could impact your data.
Step 3: Assess Risk
Once you have your list of threats, the next step is to determine how risky each threat is. Determining the risk of a threat is usually a function of assessing the nature of two other factors:
- Likelihood. How likely is it that the threat could happen? Phishing is very likely. A fire is moderately likely. Someone using a forklift to hijack your ATM is less likely… Unless you operate near a construction site, in which case, it is more likely than you'd think. (If you don't believe me, here are a few examples from 2021: January, June, August, and December.)
- Potential damage. If the threat happens, how much damage could it cause? Phishing by itself might not cause a lot of damage, but if the phishing message was designed to install malware or compromise credentials, it could cause a TON of damage. In a similar way, depending on where the fire happened and what data it could affect, a fire could cause a lot or a little damage. This is why it is important to identify your assets first.
Most often, people will use a scale to rank the likelihood and potential damage and then use the results to calculate the risk of a threat, using something like the table below.

Some things you can learn from using a chart like this:
- Even if a threat is not likely to happen, it could still cause a significant amount of damage, in the rare event that it did.
- If a threat could not cause damage even if it did happen, then likelihood is less of a factor.
- Threats with a high likelihood and potential damage are the ones which need your attention most.
Takeaway: Assessing the risk of threats helps you know which ones would be most impactful.
Step 4: Apply Controls
Newton's Third Law of Motion tells us that for every action, there is an equal and opposite reaction. While Newton probably wasn't thinking about GLBA Risk Assessments when he postulated this, the idea holds true. For every threat, there needs to be equal and opposite controls to reduce the likelihood and potential damage of the threat.
For example:
| If you are concerned about: |
Then, you might want to start controlling the risk with: |
| Malware |
Anti-malware software |
| Phishing |
Security awareness training |
| Fire |
Fire suppression system |
| Forklifts |
Security cameras |
Controls are your friends. Make sure you have a layered set of controls to prevent, detect, and correct the risk of the threats you identified in the previous steps.
Takeaway: Document what you're doing to manage the risk of threats.
Step 5: Create Risk Management Plans
One of my favorite restaurants is the Cheesecake Factory. I have never met a cheesecake there I haven't liked. The problem is the slices are MASSIVE. Too much for one sitting. Even though I do my best, there is always some leftover.
Risk is the same. When you get to this step in the GLBA Risk Assessment process, you will have leftovers. This is called "residual risk." It's the remaining risk of a threat once you've implemented your controls.
So, what do you do with leftovers? Well, you can:
- Accept. When you've done as much as you can, sometimes it's okay to be content with that.
- Mitigate further. If you aren't happy with where you've left things, you might need to create a plan to get things to a point where you are happy with the results.
- Transfer. Sometimes the risks are too much, so you can share the leftovers with the people in your life.
- Defer. Put it in a box and come back to it later. Just hope it doesn't spoil while it's sitting there, waiting for you to make another decision.
Whatever you decide, be sure to show your work. Write down your plan, so everyone can be on the same page.
Takeaway: Create a plan to manage the remainder of the risks once controls have been applied.
Step 6: Validate Control Sufficiency
Are you sure your controls work? It isn't enough to say that you have anti-malware software or a fire suppression system if it wouldn't come through when you needed it. There are numerous ways to validate your controls, including audits, penetration tests, and vulnerability assessments.
In community financial institutions, there is often a disconnect between the risk management and audit functions. While the two do need to operate independently, one cannot fully exist without the other. The results of testing can be used to highlight additional threats, as well as identify missing or misapplied controls.
Learn more about the relationship between risk management and audit in our blog: What is an IT Audit Risk Assessment?
Takeaway: Testing your controls is a critical part of the GLBA Risk Assessment process.
Congratulations!
Now go back to Step 1 and start over. While a risk assessment occurs at a single point in time, the GLBA Risk Assessment process is a living and ever-evolving thing. It needs to be regularly reviewed and updated to ensure you can continue to mitigate the risk of threats to your organization's assets and data.
There's a reason the GLBA Risk Assessment sits as the foundation of your information security program. While a GLBA Risk Assessment may exist for compliance, the intent and results can be used for much, much greater purposes, like communicating significant risks to your organization; identifying gaps and requesting additional resources for controls; and justifying the effectiveness of the overall information security function.
Looking for a place to start?
Tandem Risk Assessment is a product designed to help community financial institutions create their GLBA Risk Assessment. Something special about this product is it integrates seamlessly with other components of your information security program, including Audit Management, Policies, Vendor Management, Business Continuity Plan, and Incident Management. As the foundation of your program, Tandem Risk Assessment offers tools and resources designed to help improve your risk management practices, ensure compliance, and better secure your data. Learn more at Tandem.App/Information-Security-Risk-Assessment-Software.